
 Event Notifications
Event Notifications
Amazon Yojaka raises event notifications whenever key events occur in the Amazon Yojaka product for a seller. Examples include the creation of an order for a seller, or the marketplace cancellation of an order that a seller is currently fulfiling.
The Amazon Yojaka event notification system leverages the AWS EventBridge server-less event bus service.
Event Buses
The Amazon Yojaka product delivers event notifications to an AWS EventBridge custom event bus. You can create this event bus in any AWS account of your choice. The only pre-requisite for the event bus that you use for receiving event notifications is that you must grant permissions to the Amazon Yojaka AWS account to access the target event bus.
The Amazon Yojaka AWS account to which you must grant permissions on your event bus vary based on the region and stage where your connector application is running.
Country / Area |
Stage |
AWS Account Id |
|---|---|---|
IN |
Sandbox |
227455371037 |
IN |
Production |
096882763573 |
Note
You can use the same event bus target for receiving event notifications for one or more sellers, or use separate event buses (possibly in separate AWS accounts) for each seller that your connector application works with.
Creating an Event Bus
This section describes the process of creating an AWS EventBridge event bus using the AWS console. You can find more detailed instructions here.
Login to the AWS console of the AWS account in which you want to create the custom event bus target.
Make sure that you selected the correct region in your AWS account. eg: for Country -IN it is
eu-west-1.Navigate to the Amazon EventBridge service.
In the navigation pane on the left side, click on Event buses and then click on the Create event bus button.
In the Event bus detail section, provide a name for the event bus.

In the Resource-based policy section, click the Load template to define who can access the event bus you are creating.
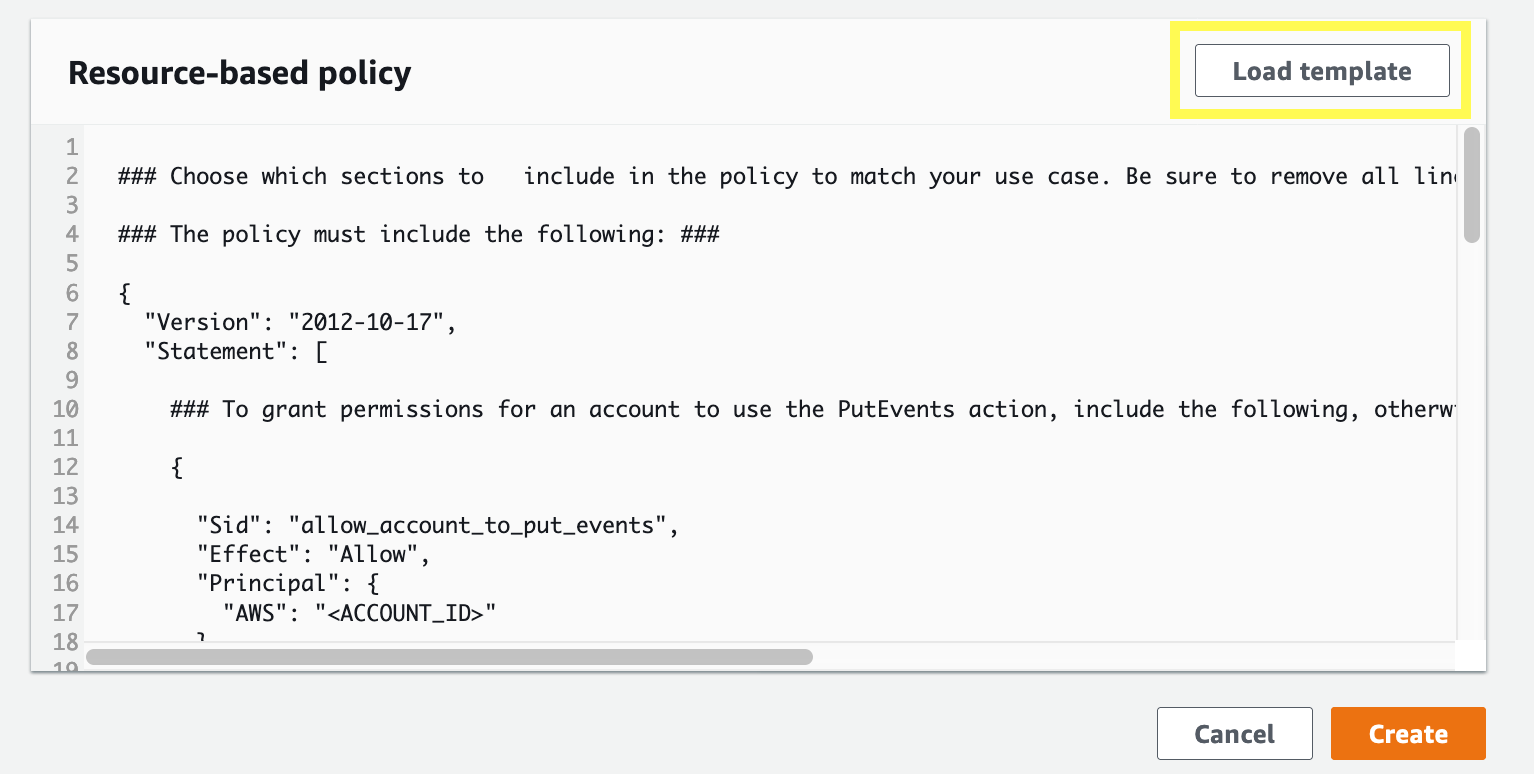
Below is a reference Resource-based Policy which you can use. Provide the Amazon Yojaka AWS account that is relevant for the stage and region that you are working in from the table above.
 1
 2
 3
 4
 5
 6
 7
 8
 9
10
11
12
13
14
15
16
17
18
19
20
21
22
23
24
25
26
27
28
29
30
31
32
33
34
35
{
    "Version": "2012-10-17",
    "Statement": [
         {
              "Sid": "allow_account_to_put_events",
              "Effect": "Allow",
              "Principal": {
                  // Use the Sandbox/Prod AWS account id mentioned in the above table
                  "AWS": "arn:aws:iam::<AWS_ACCOUNT_ID>:role/AmazonEventBridgeInvokeEventBus"
         },
              "Action": "events:PutEvents",
                  //Use the event bus ARN you created
              "Resource": "arn:aws:events:eu-west-1:54448906XXXX:event-bus/AmazonYojakaEventBus"
         },
         {
              "Sid": "allow_account_to_manage_rules_they_created",
              "Effect": "Allow",
              "Principal": {
                  // AWS account id in which the event bus is created
                   "AWS": "arn:aws:iam::54448906XXXX:root"
              },
              "Action": [
                    "events:PutRule",
                    "events:PutTargets",
                    "events:DeleteRule",
                    "events:RemoveTargets",
                    "events:DisableRule",
                    "events:EnableRule",
                    "events:DescribeRule"
              ],
                 //Use the event bus ARN you created
              "Resource": "arn:aws:events:eu-west-1:54448906XXXX:event-bus/AmazonYojakaEventBus"
         }
    ]
}
Click the Create button to create the custom event bus.
Event Subscriptions
To receive events from Amazon Yojaka, a connector has to create an event subscription for one or more events and specify an AWS EventBridge custom event bus to receive the event notifications. An event subscription is created on a per seller basis. This means that a connector will have to create one event subscription per seller on whose behalf the connector wishes to receive events.
Tip
Refer to the Events API documentation for information about the APIs to create and manage event subscriptions
Creating an Event Subscription
To create an event subscription, use the createEventSusbcription API. You need to specify the Amazon Yojaka event types that you want to subscribe to and provide the ARN of an AWS EventBrdige event bus that will receive the specified event notifications.
Event Payload
Every event that you receive from Amazon Yojaka on your event bus will contain a standard set of fields which are defined by the AWS EventBridge service. The standard fields that are mandatory in every event payload are:
version
id
detail-type
source
account
time
region
detail
Payload Fields
This section describes each of the payload fields that you will receive in an event notification.
Field |
Description |
|---|---|
version |
By default, this is set to 0 (zero) for all events. |
id |
This is a unique identifier that is generated for each event. You can use it to track events as they pass through your systems. |
detail-type |
This field will identify the type of event that has been raised by the Amazon Yojaka system. The list of event types that are currently supported by the Amazon Yojaka product are:
Use this field to identify the type of event that occured and interpret the contents of the detail field accordingly. |
source |
This field identifies the source of the event within the Amazon Yojaka product. It is guaranteed that the value in this field will always begin with the string com.amazon.yojaka. Valid values for this field are: com.amazon.yojaka.orders - Indicates that the event originated from the Orders sub-system with the Amazon Yojaka product. |
account |
This field contains the AWS account id which raised this event. This account id will match the value in the table above based on the stage and region that you are working in. |
time |
Specifies the time at which the event was raised from the Amazon Yojaka system. |
region |
Identifies the AWS region in which the event was raised. |
detail |
This is a JSON object whose contents vary based on the detail-type field. This JSON field will contain details about the exact event that is being notified by the Amazon Yojaka product. |
Detail Payload
This section describes the contents of the detail JSON object that is provided in each event notification raised by the Amazon Yojaka product. The contents of this JSON object vary based on the detail-type field. At a bare minimum, the JSON object will always contain the merchantId attribute which will contain the id of the seller for whom the event has been raised.
Orders.Created
This detail-type event is raised when a new order is created in Amazon Yojaka for a seller by a marketplace.
{
    "orderId": "The id of the newly created order",
    "locationId": "The id of the location to which this order has dropped"
}
Orders.Unfulfillable
This detail-type event is raised when a new order is dropped in Smart Connect by marketplace but the inventory in Smart Connect is not available to fulfill this order.
{
    "orderId": "The id of the newly dropped unfulfillable order",
    "locationId": "The id of the location to which this order has dropped"
}
Orders.Cancelled
This detail-type event is raised when an order that was previously dropped to Amazon Yojaka has been cancelled by the marketplace.
{
    "orderId": "The id of the cancelled order",
    "locationId": "The id of the location to which this order had been dropped"
}
Orders.Delivered
This detail-type event is raised when an order that was previously dropped to Amazon Yojaka is successfully delivered to the buyer.
{
    "orderId": "The id of the delivered order",
    "locationId": "The id of the location to which this order had been dropped"
}
Orders.Updated
This detail-type event is raised when the status of an order was changed because of order workflow related operations. This is a superset of all order related events including the ones mentioned above. The event payload includes the newly updated status of the order. Connectors can choose to setup AWS EventBridge rules to filter on the status field in the event payload and process only those status change events that are of interest to them.
{
    "orderId": "The id of the updated order",
    "locationId": "The id of the location to which this order had been dropped",
    "metadata": {
            "status": "The newly updated status of the order such as CONFIRMED, PACKAGE_CREATED, etc",
            "processingSource": "It is an optional attribute which denotes source of order operation. Eg: If order is Shipped using
            Non-Smart Connect Platform then this attribute value will be EXTERNAL_PLATFORM. Possible values are EXTERNAL_PLATFORM, INTERNAL_PLATFORM."
        }
}
Returns.Created
This detail-type event is raised when a new return is created in Amazon Yojaka for a seller by a marketplace.
{
    "returnId": "The id of the updated return",
    "returnLocationId": "The id of the location to which this return had been dropped",
}
Returns.OutForDelivery
This detail-type event is raised when a return that was previously dropped to Amazon Yojaka is out for delivery to the seller. This event can be published twice with OTP details if the return is to be delivered with OTP.
Usecase 1 :- Out for delivery is without otp for a otp supported carrier.
Because otp generation is done post out for delivery scan by the logistics team, then you can receive it again when the otp is generated.
Usecase 2 :- The otp is present in in the first out for delivery scan for a supported carrier - marketplace.
In this case you will receive it once.
{
    "returnId": "The id of the out for delivery return",
    "returnLocationId": "The id of the location to which this return had been dropped",
    "otp" : "One time password to validate the return delivery"
}
Returns.Replanned
This detail-type event is raised when tracking information of a return has been updated.
{
        "returnId": "The id of the replanned return",
        "returnLocationId": "The id of the location to which this return had been dropped",
        "returnTrackingInfo" : {
                 "reverseLegTrackingId": "The new reverse leg tracking ID which will get further updates for this return",
                 "carrierName": "The carrier name"
            }
}
Locations.Capacity
This detail-type event is raised to restrict processing of future CPT orders.
{

    "merchantId": "The id of the merchants",
    "locationDetails": "A list containing details of locations and its pending limit, The 'pendingLimit' attribute will indicate how many pending orders will be processed."

 }
Example
Below is the sample Event Payload that you would send to restrict the processing of future CPT orders.
{
"merchantId": "<merchantId>",
"locationDetails": [
    "<locationId1>": {
        "pendingLimit": 0,
        "channelName": "FBA",
        "marketplaceName": "AMAZON_IN"
    },
    "<locationId2>": {
        "pendingLimit": 2147483647,
        "channelName": "FBA",
        "marketplaceName": "AMAZON_IN"
    }
 ...
]
}
Returns.Updated
This detail-type event is raised when the status of an return was changed. The event payload includes the newly updated status of the return. Connectors can choose to setup AWS EventBridge rules to filter on the status field in the event payload and process only those status change events that are of interest to them.
{
    "returnId": "The id of the updated return",
    "returnLocationId": "The id of the location to which this return had been dropped",
    "metadata": {
            "returnStatus": "The newly updated status of the return such as CUSTOMER_CANCELLED_PICK_UP, CARRIER_NOTIFIED_TO_PICK_UP_FROM_CUSTOMER, etc"
        }
}
Example
Below is an example of a payload that you would receive for an order event from the Amazon Yojaka product. Similarly return event will have payloads illustrated above
{
    "version":"0",
    "id":"ed4b8165-75ad-5c60-3e0f-0276f8b55dd3",
    "detail-type":"Orders.Created",
    "source":"com.amazon.yojaka.orders",
    "account":"096882763573",
    "time":"2020-04-12T11:31:15Z",
    "region":"eu-west-1",
    "resources":[],
    "detail":{
        "orderId":"99efdcc8-0451-4327-b9b4-6bf8b61653e7",
        "locationId":"ad5c9b46-5391-4e10-831f-f279b60d8095",
        "merchantId":"A15DHF3L2G99Q0"
    }
}
Rules
The AWS EventBridge service allows you to define rules on your event bus to filter our events and choose how you want to process the filtered events. You could choose to have a single rule for all events you receive or filter them based on any field in the event payload. Typically, you might filter rules either based on the detail-type field (to process individual event types differently) or based on the merchantId in the detail field (to process individual sellers differently).
Note
To work with event notifications from Amazon Yojaka, you need at least one rule to deliver the events to a target for further processing.
Creating a Rule
This section describes the process of creating an AWS EventBridge rule using the AWS console.
Login to the AWS console of the AWS account in which you want to create the custom event bus target.
Navigate to the Amazon EventBridge service.
In the navigation pane on the left side, click on Rules.
Select the event bus in which you want to create the rule in the Event bus select list.
Click the Create rule button to create a new rule.
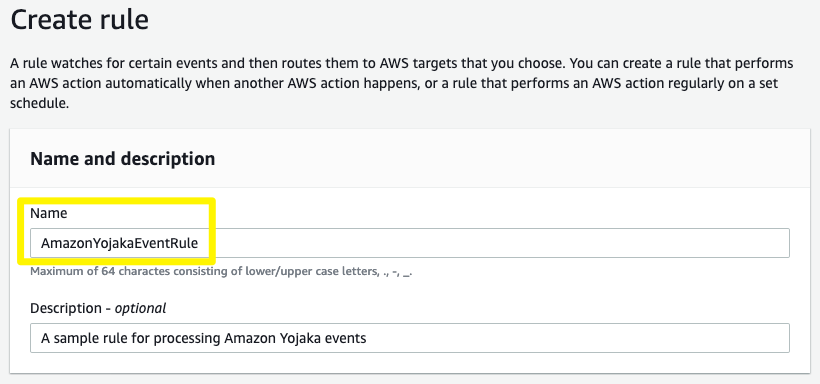
In the Name and description section, provide an appropriate name and an optional description.
In the Define pattern section, select the Event pattern option, and then select the Custom pattern option.
In the Event pattern field, at a bare minimum provide the following JSON snippet. In a later section, examples of other event patterns are discussed. The AWS account id specified in the rule below should match the Amazon Yojaka AWS account id for your stage and region from the table above.
{
    "account": [
        "096882763573"
    ]
}
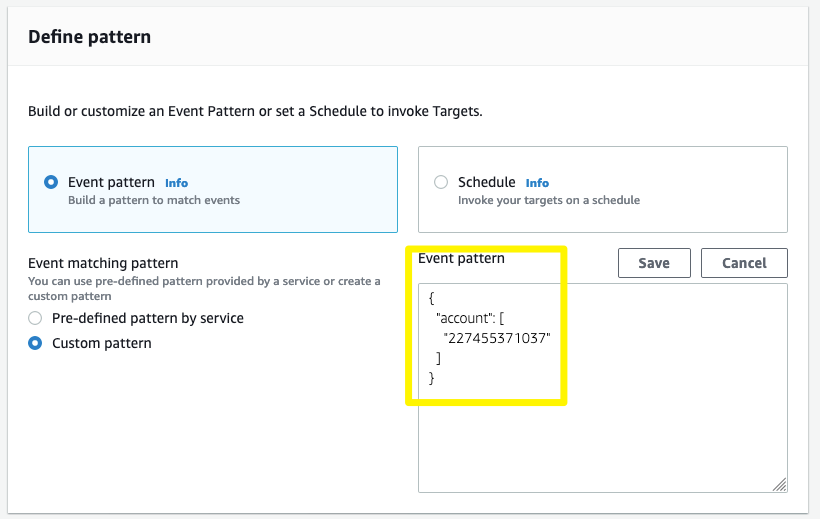
Click the Save button to save the event pattern.
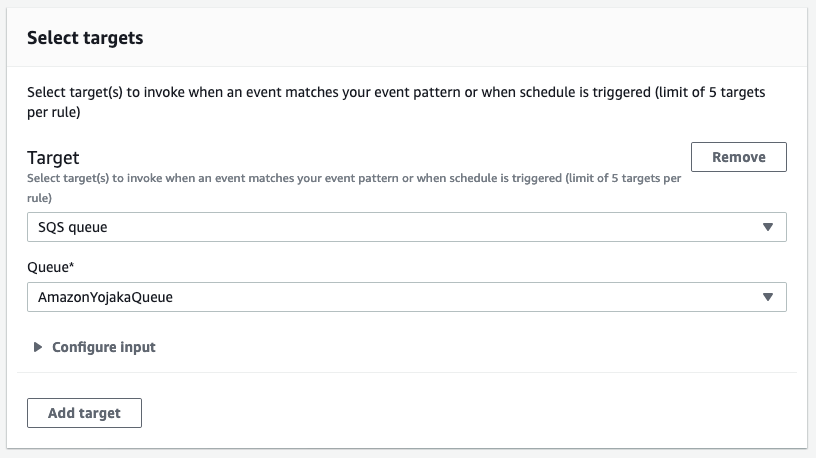
In the Select targets section, choose a target for the event notification. The selected target will receive the event payload for further processing. In the example below, an Amazon SQS queue has been selected as the target for the rule. AWS EventBridge supports multiple options as the target for a rule. You can choose the option that works the best with your connector application.
Click the Create button to create the rule
Once the rule has been created, and you have registered the event bus with Amazon Yojaka using the createEventSusbcription API, your event bus will start receiving events for the registered event types as and when they occur. Based on the event pattern defined in your rule, all matching events will be delivered to the target(s) defined on the rule.
Tip
You can have multiple rules defined on the same event bus and process events differently based on different event patterns. A single rule can have up to 5 targets. When an event matches the event pattern on a rule, all the targets of the rule will receive the event.
Event Patterns
In the section above, a sample event pattern for a rule has been given. This is a basic event pattern and contains the mandatory account pattern for filtering. In this section, a few more sample event patterns are discussed.
Event Type Filter
To filter all events of type Orders.Created from the com.amazon.yojaka.orders source, use the following event pattern.
{
    "account": [
        "096882763573"
    ],
    "source": [
        "com.amazon.yojaka.orders"
    ],
    "detail-type": [
        "Orders.Created"
    ]
}
Seller Id Filter
To filter all events from Amazon Yojaka for a particular seller id, use the following event pattern.
{
    "account": [
        "096882763573"
    ],
    "source": [{
        "prefix": "com.amazon.yojaka"
    }],
    "detail": {
        "merchantId": [
            "A15DHF3L2G99Q0"
        ]
    }
}
Combined Filter
To filter all Orders.Cancelled events from Amazon Yojaka for a particular seller id, use the following event pattern.
{
    "account": [
        "096882763573"
    ],
    "source": [
        "com.amazon.yojaka.orders"
    ],
    "detail-type": [
        "Orders.Cancelled"
    ],
    "detail": {
        "merchantId": [
            "A15DHF3L2G99Q0"
        ]
    }
}
Tip
Refer here for more information about AWS EventBridge event patterns.

On this page
